Skip to content

AI Commit Messages

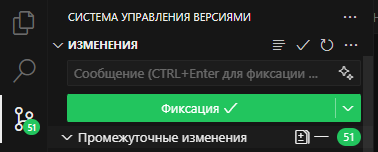
Kodik can write a commit message for you directly from the Source Control panel — one click is all it takes.

  1. Stage the changes you want to commit (git add).
  2. In the Source Control input box, click the (sparkle) icon on the right.
  3. Kodik analyzes the staged diff, infers the commit style from your repository history, and streams the result into the input box.

Generation uses the Kodik backend configured for the IDE, including kodik.apiBaseUrl when you run against a self-hosted or proxied backend.

While generation is in progress the icon changes to a stop button — click it to abort. The commands are also available from the Command Palette:
Image

The Source Control menu at the bottom of Chat uses one compact, padded panel with stable Commit, Push, and Create PR rows. It opens directly above the branch chip, so the actions do not reduce composer space in a narrow Chat pane. Focus moves into the menu when it opens, stays within its actions while you press Tab, and returns to the branch chip when you close it with Escape.

Commit does not create a commit immediately. It opens the selected repository in the editor’s native Source Control panel and focuses the commit-message input, including when Chat is pointed at a repository outside the opened workspace. Stage or unstage individual files and changes there, enter a message yourself or use Generate Commit Message, then commit with the standard Source Control controls. Conflicts and in-progress Git operations stay visible in the same panel where you resolve or continue them.

Because the native Source Control flow remains in charge, your existing Git preferences, hooks, validation, and Kodik commit attribution continue to apply.

Push becomes available only after the tree is clean and the Git provider offers Publish Branch or Sync.

Create PR prepares a request for the agent instead of contacting GitHub immediately. It inserts an editable instruction into the Chat composer, focuses the textarea, and selects [target branch] so you can type the destination branch directly. Review or extend the request, then send it when you are ready; the instruction tells the agent to review the complete branch diff, push the branch if needed, write an accurate title and description, and create the pull request.

The branch indicator also follows switches made in an external terminal, including when Chat is pointed at a folder outside the opened workspace.